Pages

Sunday, July 28, 2019

A Visit to Fort Beauséjour

This weekend was beautiful and sunny and we decided to go to visit a local historical site.  We don't often get out and do things like that, so it was a good change of pace to go somewhere new.  I thought I'd share our visit to the Fort Beauséjour site on the blog so you can live vicariously through me!  The fort actually has two names - For Beauséjour and Fort Cumberland.  It is one of Canada's oldest forts, constructed by the French in 1751.  It is on the Tantramar Marsh, very close to where we live.  The Tantramar Marsh is a tidal salt marsh.  The views from the elevated land of the fort are beautiful.

It was very windy today, although it's pretty much always windy at the head of the Bay of Fundy, and you can see the tree in the far right of the picture below has grown on an angle as a result.  It would have been more striking if I'd taken the picture from a different angle, but I think you can still see that the tree is growing on a slant.

There is an interpretive centre at the fort with lots of artifacts from the archaeological digs that have taken place over time.  Although the fort was built by the French, it was captured by the British in 1755, and became a base for the deportation of the Acadians - a dark and dreadful time in the history of Atlantic Canada.  At that time, it was known as Fort Cumberland.  Later, in 1776, the British routed a rebel force from the US, retaining the area under British rule.  It was eventually abandoned in 1835, and declared a national historic site in 1920.

Outdoors, there are a variety of different cannon and mortar examples.

The fort is star-shaped, but that's difficult to show in photographs taken at ground level, so here's a picture from an info-board at the site that shows the shape.

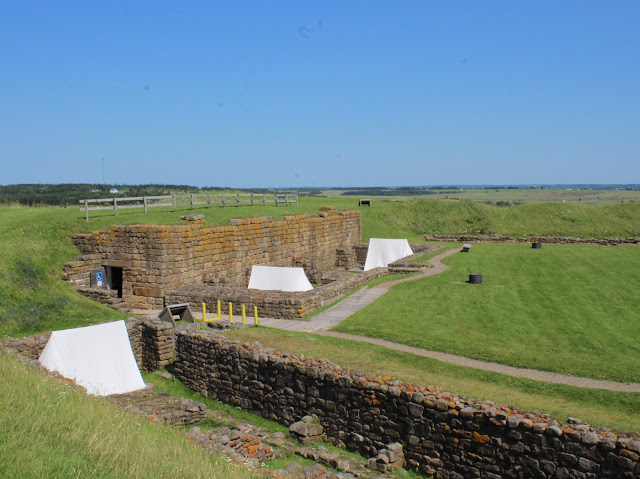
Many of the old foundations of the original buildings still exist, such as this foundation for the British men's barracks.  

There were also several restored casemates (a vaulted chamber in a fortress), both stone and timber, where provisions were stored and in the event of emergencies, they could also be used as housing. This picture is a restored stone French casemate.

This stone casemate is from the British modifications to the fort.

This is a restored timber casemate built by the French.

There was a series of narrow windows, known as a curtain wall, providing views out over the marshland and the water, giving the fort's inhabitants a clear view of approaching troops.

As you can see from the following picture, the curtain wall looked out over the water and the marshland.

I like this shot showing the fort and its star-shaped protrusions with the modern windmills in the background.  I'm glad we have green energy sources now.

The fort offers a camping experience for people who want to experience tents styled after those from the 1700s that could have been used in the vicinity.  I think that would be kind of fun.

The fort has a lot of useful information panels as well as artistic renditions of activities that would have occurred at the fort.  This adds to the experience by helping visitors imagine how life would have been at the time the fort was occupied.

We got some exercise scrambling up and down the hills, as Marc demonstrates!

All in all, it was an enjoyable visit on a very windy day, and we had fun exploring this piece of local and national history.

Sunday, July 21, 2019

UV Light for Moths

As many of my regular readers will know, I have a bit of a fondness for moths.  Odd, I suppose, for someone who loves wool, and let me tell you, if there's a clothes moth anywhere in the house, I have no fondness for it!  I think the diversity of moths is amazing though, and I love photographing all their amazing beauty when I have the opportunity.

I recently read that it's possible to attract more moths by using a UV light.  I tend to leave my screened porch light on overnight sometimes (with the screen doors open) to attract moths for photographing.  I decided that I would purchase a UV light to see if I could bring in some different species.  I bought one that is apparently used by DJs for light shows - I'm totally out of touch with that world, but apparently they like to use UV or "black lights" as they are sometimes called.  It's just a 24 inch tube-style light fixture that has a plug.  I put it on the wall of my porch very easily.


I left it on overnight last night. It really doesn't look like much when it's on, but it does have a purplish glow at night.

This morning, I think just about every moth in my entire neighbourhood was in my porch.  It was absolutely amazing.  There were hundreds, and they were everywhere.  I spent a long time out on the porch taking photographs and being completely excited about all the new moths that had come to visit.  I will definitely be using the light on a regular basis, and hope to see more new species being attracted to it.  I definitely recommend it to anyone interested in moth photography.

Here are some of the more interesting species that showed up.

Northern apple sphinx (Sphinx poecila) - this beauty was about 2.5 inches long.

The small but pretty clover hayworm moth (Hypsopygia costalis).

A gray spruce looper moth (Caripeta divisata).

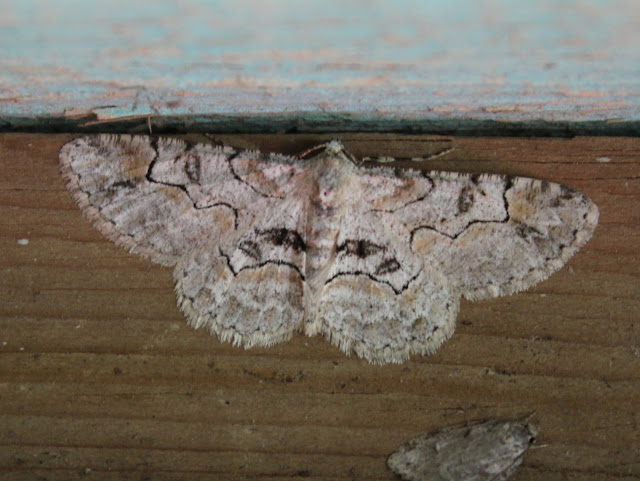
This is a beautiful bent-line gray (Iridopsis larvaria).

Another large moth that visited - the fingered dagger (Acronicta dactylina).

I love this little guy - Harris's three-spot moth (Harrisimemna trisignata).  It's not a common moth around here and has such a pretty pattern.  I was really excited to see it.

I'm not 100% sure on this one but believe it is the bent-winged owlet (Bleptina caradrinalis).  Please correct me if I'm wrong on that.

This beauty is the olive angle shades moth (Phlogophora iris).

The red-humped caterpillar moth (Schizura concinna) holds up its wings at an unusual angle.

The tiny but elegant silver-spotted fern moth (Callopistria cordata).

The black-dotted glyph (Maliattha synochitis).  That spot on its back is a distinct olive green colour.

The wavy-lined heterocampa moth (Heterocampa biundata).

Finally, the lovely large lace border moth (Scopula limboundata).  I'm so pleased to have tried a UV light for mothing, and I hope to share more visitors soon!

Monday, July 15, 2019

Garden Update

Here's a short update on my 2019 garden progress.  We had a very long, wet, cold, damp, chilly, moisture-laden, unseasonably frigid spring.  Did I mention that it was also long, cold and wet?  So, everything in the garden is waaaaay behind normal, even in our very short season climate.  This makes for a particularly difficult gardening season for 2019.  I don't hold out much hope that it will bring harvests like last year (although last year was pretty cold and wet too), but at least there is some progress.

The first raised bed that I got planted this year was with transplants from seed I'd started under plant lights - Amazing Cauliflower, Violaceo di Verona Cabbage, Calabrese Green Sprouting Broccoli, Scarlet Kale, and Russian Red Kale.  Most of those seeds came from Baker Creek Heirloom Seeds. I've had it under row cover all season because of the cabbage white butterflies.  I still had some slugs under there, but in general the plants are in good shape.

The broccoli is just starting to make heads.  Here's one next to a toonie ($2 Canadian coin) for size comparison.

 This bed is beets on the right hand side (mixed varieties and then some touchstone gold), some onions in the middle, and some carrots on the left.  Carrots had poor germination so I've re-seeded some parsnip in there a few days ago.  In the background you'll see a little page-wire fence circle with potatoes growing in it.  This year I'm growing Violet Queen, Amarosa, and another variety whose name I've forgotten, but it might be Prince of Orange.

This bed has some squash and cucumber in it that are not making very good progress yet. Also a random tomato plant in the corner given to me by a friend, with the intriguing name of Banana.  I planted some parsnip in this bed also but it's not germinating terribly well.

This bed is one of the better ones - my Golden Sweet peas have just started to come out and I picked and ate a few on the weekend.  There are some runner beans on frame in the back as well.  In the front there are loads of mixed onions, and my kiwi vines are on the left.  I have somebody building me an arbour for those soon, so they will be transplanted into a permanent location.

This bed has some interesting bush peas that I am trying with the fascinating name (part of which I may be pronouncing incorrectly) of Desiree Dwarf Blauwschokkers.  They are from Holland.  They have flowered but there are no pods yet.  The rest of the bed is carrots, and another random tomato.  The carrots are Pusahira Red, which did well last year, Purple Dragon and Black Nebula. 

This is the tomato bed.  Soon I need to construct some supports.  I have quite a few different varieties going this year:  Arkansas Traveller, Nebraska Wedding,  Sun Gold (my fave!), Sweet Million, Dark Galaxy, Green Vernissage, Black Vernissage, Black Krim, Hillbilly Potato Leaf, Jaune Flammee, and Clementine.

My grape vines are putting on some good growth - they went in last fall, so I'm pleased with their progress so far given the poor spring.

Unfortunately, despite some blossoms, none of my fruit trees have any fruit this year.  The apple and plum flowered, but nothing made it - probably the poor weather and possibly lack of pollinators.  I planted some new apples with my Dad this spring, as well as a pear and a cherry.  My 'fruit salad' tree from last year had some flowers but again no fruit.  One of my blackcurrant bushes has some fruit on it, but the gooseberry died over the winter and the other currants are looking a bit sad.  The bush cherries didn't flower.  It really was a miserable spring.  There were quite a few reported bird deaths due to starvation from birds that migrated in the usual time frame but came back to no bugs or other food sources and subsequently died.  Very sad.  I'm hoping we have a long season with no early frosts, but that may be too much to hope for.

I did see some flowers on the blackberry bushes on the edge of the woods, so I may have some of those if I'm lucky!

Monday, June 24, 2019

Rug-Making Workshop

This weekend I attended a rug-making workshop at Legacy Lane Fibre Mill in Sussex, New Brunswick.  The majority of rug-making events in my part of the world are about rug-hooking, which is a technique in which wool fabric strips or yarns are pulled in little loops through a backing in order to make a rug with a particular design.  I have tried rug-hooking, but it's not something I do very often.  My weekend workshop was a completely different type of rug-making technique based on felting. 

We used very bulky corespun yarn (spun at the mill) in our rugs - it was about the diameter of one of my fingers - so really thick yarn!  Before the workshop, we had to choose colours that we would like in our yarn.  I chose turquoise, blue and grey.  The yarn is made by wrapping fibre around a 4-ply wool core.  The colours slowly change through the skein.  We had to get the yarn wet and then we created spiral circles with the yarn on the surface of a large felting machine.  Each participant had a space of about 2 by 3 feet on the table.  I didn't take any pictures during the process of making the spirals, but here you can see the felting table surface.

After making our spirals, alpaca/wool batting was placed on top of the spirals to form the rug base.  The felting table has a large, heavy top, which is closed to squeeze out all the water and to begin agitation of the wool, which starts the fulling process.  Fulling is a step before felting, during which the fibres begin to lock together.  After 10 minutes on the felting machine, the lid is lifted and you can see here the backing fibre which has been compressed and fulled against the spirals.  Twp rugs fit on the press.

The rugs were then transferred in a 'sausage roll' format into a spin dryer.  They did a normal spin cycle in an old top-loading spin-dryer before being put outside in the sun to dry.  Fortunately it was a beautifully sunny day with some good wind to get the rugs drying quickly.  Here's my rug along with another one when it first came out of the dryer.  You can see how the spirals adhere to the backing felt, but at this point, with a little effort, you could have pulled it apart.

While the rugs were drying, we learned how to do blanket stitch on a small sample rug, since our rugs will eventually be blanket-stitched all the way around to keep the edges nice and sturdy.  The resident mill cat, Cookie, supervised from her own blanket throne, although she did do some sleeping on the job!

After the rugs were mostly dry, we had to cut them roughly around the edges before they could go into the needle felting machine.  The needle felter pokes hundreds of felting needles into the surface of the rug, and as it felts, the rug begins to shrink a bit.  Keeping the edges wide ensures that the shrinking doesn't go too far.

The rugs get passed through the felting machine ten times in total - five times per side.  Each time you put it into the machine, you vary the angle so that the needles don't always go in exactly the same place.  Here's a couple of rugs being fed into the needle felter.

Here's mine coming out the other side after one of the passes.  The needles compact the wool each time, making the colours more vibrant on each pass.

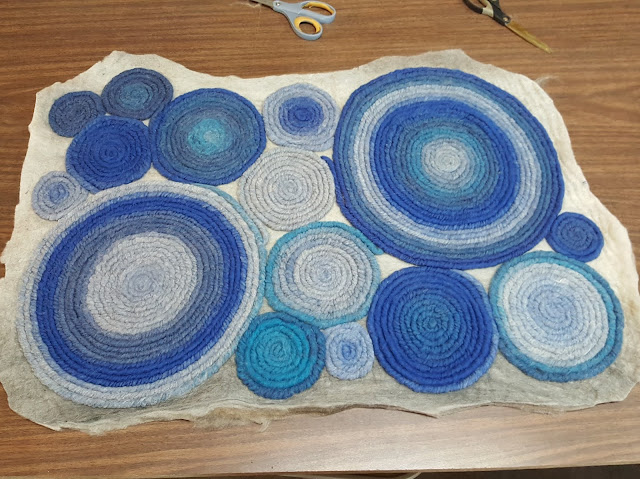
After the ten passes through the felter, the rug is ready for final trimming, which is done much more closely to the edges of the spirals.  The last step will be blanket stitching the edges, which I haven't yet done. 

All the rugs were beautiful.  This one looks like it belongs in a spa.

Lots of pretty colours.

Some prior rugs we were shown as examples demonstrate how you can use just natural fleece colours if you wish, like this one from 100% alpaca. You can see the blanket stitching on this one.

Here's my final rug at home, with my foot in the picture for scale.  I'm really pleased with how it turned out, and I think I'll use it in the bedroom or bathroom.  It's so soft on the feet!

Friday, June 14, 2019

Freshly Fledged

Here's a really quick blog post in the midst of busy times - I just had to share!

This morning I awoke to the hairy woodpecker making quite a racket outside my bedroom window.  He's not usually that vocal and I wondered what was up.  I watched him for a while and nobody was chasing him or causing any distress that I could see.  Then I wondered....does he have a baby out there?

I went out quietly to let the chickens out as usual, and sure enough, the woodpecker was still there, chirping loudly at something.  I ventured closer (the male hairy woodpecker lets me get very close when he's on the feeder so I wasn't too concerned).  Sure enough, there on the ground was his wee son, all wet and bedraggled. 

I used the zoom lens so as not to disturb him too much.

After watching Dad feed him a few times, I moved him, because I'm worried about the neighbor's cat.  I put him to a higher location, up on the post where I keep my clothespins and weather station components. 

I continued to watch Dad bring him insects.

Learning to climb is tricky for young woodpeckers!

"Dad!  Dad!  What did you bring me?"

"Yum!  Thanks Dad!"

I hope he learns to get up off the ground quickly and go on to live a long, insect-fuelled life!