Pages

Showing posts with label felting. Show all posts

Monday, June 24, 2019

Rug-Making Workshop

This weekend I attended a rug-making workshop at Legacy Lane Fibre Mill in Sussex, New Brunswick.  The majority of rug-making events in my part of the world are about rug-hooking, which is a technique in which wool fabric strips or yarns are pulled in little loops through a backing in order to make a rug with a particular design.  I have tried rug-hooking, but it's not something I do very often.  My weekend workshop was a completely different type of rug-making technique based on felting. 

We used very bulky corespun yarn (spun at the mill) in our rugs - it was about the diameter of one of my fingers - so really thick yarn!  Before the workshop, we had to choose colours that we would like in our yarn.  I chose turquoise, blue and grey.  The yarn is made by wrapping fibre around a 4-ply wool core.  The colours slowly change through the skein.  We had to get the yarn wet and then we created spiral circles with the yarn on the surface of a large felting machine.  Each participant had a space of about 2 by 3 feet on the table.  I didn't take any pictures during the process of making the spirals, but here you can see the felting table surface.

After making our spirals, alpaca/wool batting was placed on top of the spirals to form the rug base.  The felting table has a large, heavy top, which is closed to squeeze out all the water and to begin agitation of the wool, which starts the fulling process.  Fulling is a step before felting, during which the fibres begin to lock together.  After 10 minutes on the felting machine, the lid is lifted and you can see here the backing fibre which has been compressed and fulled against the spirals.  Twp rugs fit on the press.

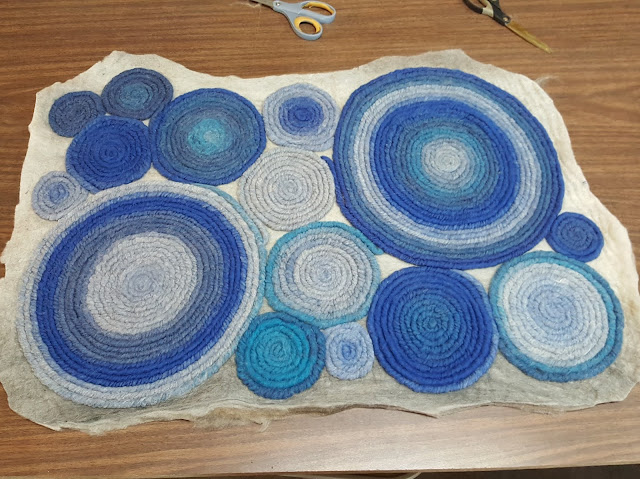
The rugs were then transferred in a 'sausage roll' format into a spin dryer.  They did a normal spin cycle in an old top-loading spin-dryer before being put outside in the sun to dry.  Fortunately it was a beautifully sunny day with some good wind to get the rugs drying quickly.  Here's my rug along with another one when it first came out of the dryer.  You can see how the spirals adhere to the backing felt, but at this point, with a little effort, you could have pulled it apart.

While the rugs were drying, we learned how to do blanket stitch on a small sample rug, since our rugs will eventually be blanket-stitched all the way around to keep the edges nice and sturdy.  The resident mill cat, Cookie, supervised from her own blanket throne, although she did do some sleeping on the job!

After the rugs were mostly dry, we had to cut them roughly around the edges before they could go into the needle felting machine.  The needle felter pokes hundreds of felting needles into the surface of the rug, and as it felts, the rug begins to shrink a bit.  Keeping the edges wide ensures that the shrinking doesn't go too far.

The rugs get passed through the felting machine ten times in total - five times per side.  Each time you put it into the machine, you vary the angle so that the needles don't always go in exactly the same place.  Here's a couple of rugs being fed into the needle felter.

Here's mine coming out the other side after one of the passes.  The needles compact the wool each time, making the colours more vibrant on each pass.

After the ten passes through the felter, the rug is ready for final trimming, which is done much more closely to the edges of the spirals.  The last step will be blanket stitching the edges, which I haven't yet done. 

All the rugs were beautiful.  This one looks like it belongs in a spa.

Lots of pretty colours.

Some prior rugs we were shown as examples demonstrate how you can use just natural fleece colours if you wish, like this one from 100% alpaca. You can see the blanket stitching on this one.

Here's my final rug at home, with my foot in the picture for scale.  I'm really pleased with how it turned out, and I think I'll use it in the bedroom or bathroom.  It's so soft on the feet!

Sunday, December 11, 2016

Tree Ornaments

It was great to spend time with my parents, decorating their Christmas tree.  Our family tree has many ornaments on it, a large majority of which are handmade.  Some also come from trips that have been taken to various places, with the ornament having been purchased as a memory of that trip.  It is wonderful to get the ornaments out each year and remember their stories.  I thought I would share some of the ornaments (especially sheep themed ones!) for a post to share with the All Seasons meme hosted by Jesh in California.  Lots of pictures here, so sit back with a cup of tea and enjoy!

Here's a little cross-stitched ornament I made many years ago as part of a set of 4 farm-themed stockings.  There's a sheep, a chicken, a bird feeder, and a pig.  They're cute little ornaments that fit our mostly-handmade theme.  You can see a handmade straw ornament from Europe in this picture to the lower left.

Here's a little alpaca ornament that I love - so fluffy!  I crocheted the star on the right, and my mom needle-felted the owl on the left.  We do love fibre arts!

Here's another little woolly sheep with a scarf to keep her warm.

This sheep is one of a set of 3 ceramic ornaments - a sheep, a cow and a pig.  They are quite heavy so this one needs to go on a sturdy branch.  To the right, you'll see a wee nativity scene that is a very old wooden ornament, and in the background there's a wooden bird that I bought on a visit to Prague.

Here's a pear that I knitted for the tree (yes, there's a partridge, keep scrolling!) and next to it is a little felted hen sitting in a golden walnut shell nest.  My mom made a set of those cute hen ornaments!

Here's the partridge - but he's crocheted, not knitted.

This lovely woolly sheep is a Nova Scotian artist's ornament - such a neat design.  Behind it is a felt snowman couple that was made for me when I was a little child by my next door neighbor's grandmother.  She made several lovely ornaments for me then.  I think that was about 40 years ago.  There's also a star made from wood shavings under the sheep.

This is a silk hand-painted parrot ornament - very tropical!

Here's another sweet little hen on her walnut shell nest!  My mom does a great job on her needle-felted ornaments.

I don't recall where this ornament came from but it is so cute!  It's a little mouse and she's sitting inside a thimble, which you can't see in this picture.   Very detailed work, but so effective!

This is one of my mother's favourites - it's a little wooden tree with cut-out gingerbread men hanging on it.  We haven't seen any like this again - quite unusual.

 Yet another woolly felted sheep!

This little dog on a cushion is an ornament I made in my teens.  I made ornaments to sell one year, and this was one of the designs.  They sold really well!  We still have a couple of these on the tree.

Here's a traditional Christmas pudding that I crocheted.

Here's a sweet little felt mouse in a stocking, handmade and embroidered by my mom.  It's one of my favourite ornaments, too!

This owl was also made by my childhood friend's grandmother.  A simple but cute design!

My parents have a Welsh Terrier, Bella.  She's their third Welshie, and here's an ornament depicting a Welsh Terrier made out of felt.  You can also see a couple of ceramic mouse ornaments from an artist I like who has ornaments made of some of her paintings.

This pair of mice are also hand-made from felt by my mother, and she gave them very snazzy outfits for the holidays!


This mouse is another cute ornament, although I don't remember where it came from.  He's wearing a sweet little chef's hat and carrying a candy cane.

I hope you've enjoyed this little tree "tour" around some of my favourite ornaments, and maybe even have some ideas of some ornaments to make for yourself!

Monday, September 7, 2009

How I felt(ed)

Today, since it was a holiday from work and school, I wanted to do something fun. I still have readings to do for class tomorrow, and the kitchen needed some major attention today (in terms of tidying) but I still set aside time for fun. Today's fun was doing some wet felting. I love spinning, but felting is another interesting way to use fibre, and the wet felting technique can create some really interesting pieces.

I did four different felts today. This first one used a white base with some dyed fibres on top, and then I used feltable wool yarn in looping patterns to see how it would look when the wet felting was complete. The yarn adhered well to the base and the colours worked quite well together. I'm not sure how I'll use this piece but I like it.
The second felt is the base piece for some needle felting that I plan to do. Once the base felt is dry, it's easy to needle-felt other designs onto the base. This is a kind of woodsy scene (tree shape in upper right, sun on upper left, and a kind of path or stream through the middle. I'm going to have fun playing with this one over time.
My favourites of the pieces I did today are these two similar pieces that I felted with a base colour, onto which I added dyed locks - some mohair (that's from angora goats), some Lincoln, or other long-wooled sheep locks. The locks don't felt into the background quite like other wools do - they tend to sit on the top a bit more. They do adhere in places though, so overall they stick to the base. I like it that they don't felt in completely because it means their texture and curls are still very apparent.
To wet felt, one makes layers of fibre criss-crossed over each other, so that the fibers face in all different directions. Then, after laying on multiple layers of different fibres (colours, types, etc) one sprinkles it with very hot water and detergent. I put it between two layers of sheer fabric (old curtains) and then I start rubbing the design into the background. After the whole thing is wet and bubbly with detergent, I roll it up inside an old bamboo blind, and then in an old towel, and I begin to roll it back and forth. After about 100 rolls in one direction, I change the direction of the piece by unrolling it and turning a quarter turn. Another 100 rolls. Repeat both directions again. Then, I rinse out the detergent and hang them outside to dry. I could do more rolling to make it tighter, but on these pieces I didn't.

The best part is watching the transition from a pile of dry wool going every which way, to a finished piece.